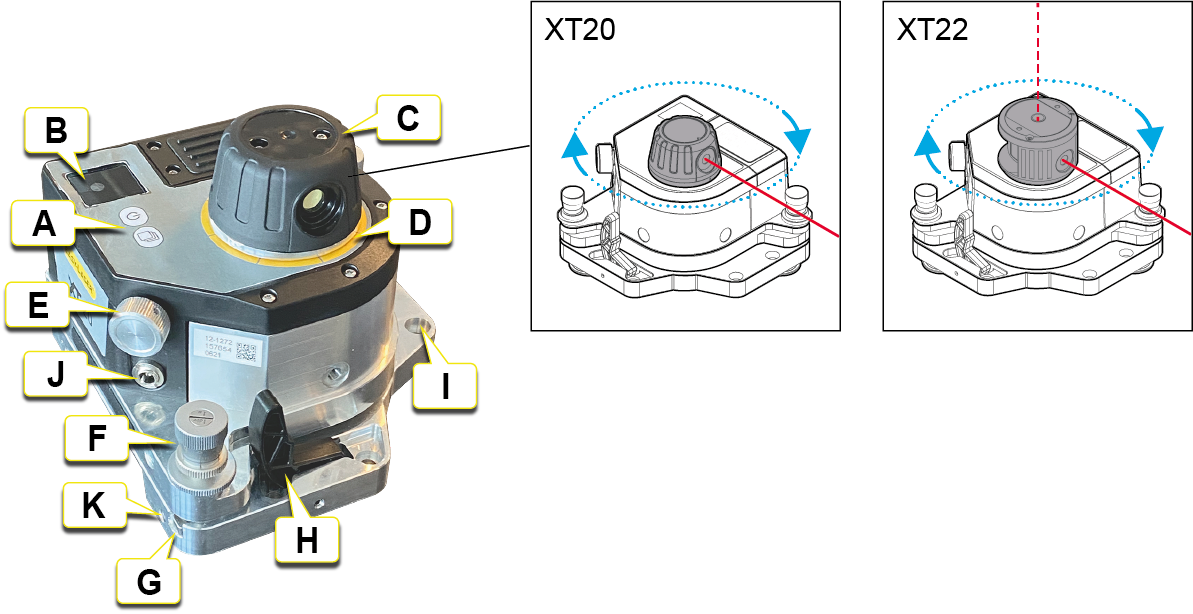
Laser transmitter XT20/XT22
Laser transmitters XT20 and XT22 with digital display and electronic levels.
XT20 and XT22 can be used with XT programs Straightness and Values.
The XT22 also has an extra vertical level and built in reversible angular prism which makes it useable for all kinds of geometrical measurements.
The XT20 and XT22 can be wirelessly connected to your Easy-Laser® XT alignment app.
-
 On/Off,
  Change Display view.
 - Measuring display.
-
Laser head (with reversible angular prism for XT22) that can be rotated by hand.
- Marking for every 45°, for quick rough alignment.
- Fine adjustment.
- Tilt screw (x2).
- Tilt table.
- Release lever. Also for dampening magnet force when placed on the surface.
- Fastening of magnet base.
- Power adapter charging port.
- Threaded M6 hole (x4) for safety strap and other accessories/adaptations.
Safety strap
Use an approved safety strap to prevent equipment from falling and causing injuries. Choose a safety strap that has been approved for the weight it should carry, and for the circumstances under which it will be used. Always follow your company's internal rules for safe work. The safety strap should be connected to the equimpent using the M6 screw provided (part. no 01-1402). Check the strap for damages and wear regularly. If it has been involved in a sharp drop, please replace it. Fasten the strap above the equipment.
Tilting screws
The tilting screws on the levelling table of the laser transmitter have to be operated carefully and according to instructions.
Visual rough alignment to (detector) target
Check the position of the fine adjustment screw. It should be in its nominal position appro. 2.5 mm.
- Loosen the locking screw.
- Adjust with the course screw to wanted position.
- Tighten the locking screw.
Digital fine adjustment to detector and read values
- Check so that the locking screw is tightened.
- Adjust with the fine adjustment screw to wanted value.
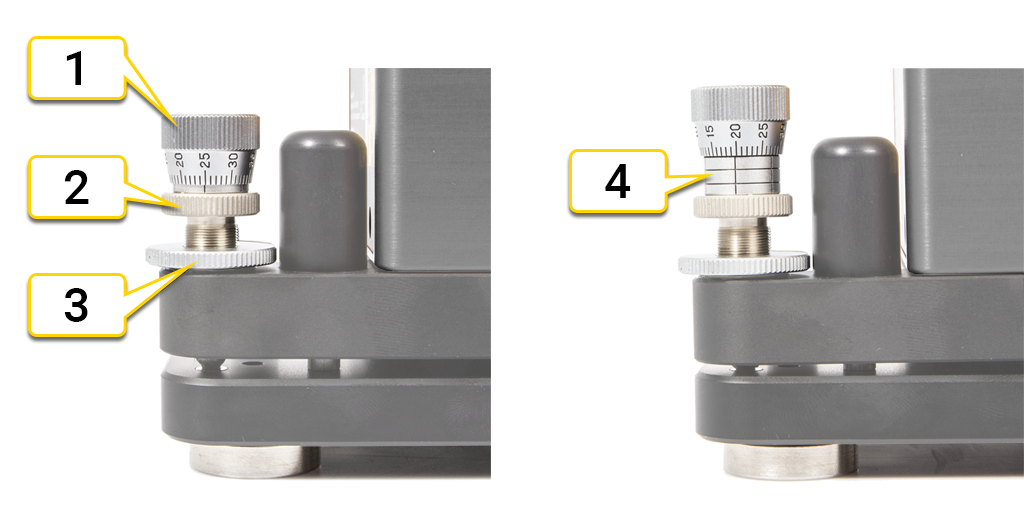
- Fine adjustment screw
- Coarse screw
- Locking screw
- Maximum position
Charge XT20/XT22
Charge XT20/XT22 by plugging in the power adapter. It is possible to keep on using the XT20/XT22 while it is charging, see NOTE below.
Display view when charging.
Charging temperature, Go to XT20/XT22 Technical data
NOTE! If the laser transmitter is charged when "ON", the charging time will be longer to reduce heat generation that can affect measurement stability. For best measurement stability and shortest possible charging time, it is recommended to charge the XT20/XT22 when "OFF".
Setting of angular unit for Laser Transmitter XT20 and XT22
Tap the Live Device View to open Context menu and tap "RESOLUTION". Set angular unit and resolution (number of decimals) for XT20/XT22. The angular unit and resolution in the XT20/XT22 measuring display will be the same as the settings in the app.
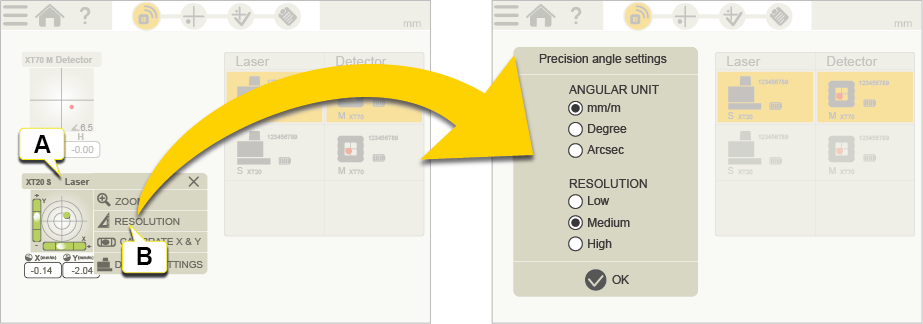
- Tap the Live Device View to open Context menu.
- Tap to set angular unit and resolution.
Settings for XT20 and XT22
Tap the Live Device View to open Context menu and tap "SETTINGS". Set Display view, Filter level and activation/deactivation of Shake warning and Temperature warning.
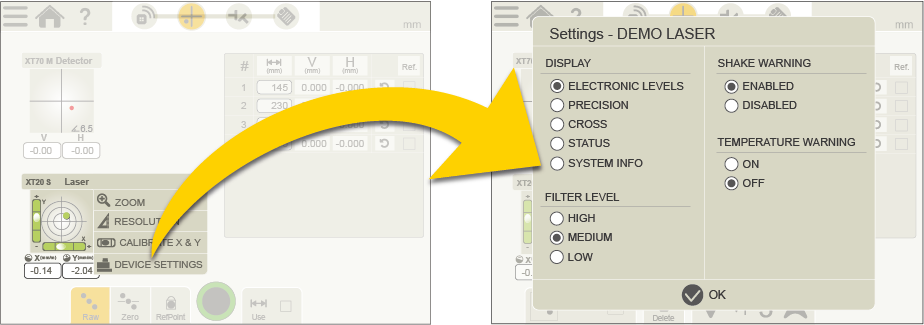
NOTE! You can only select filter when the XT20/XT22 is connected to the XT app. "Low" filter level is default when not connected.
Calibration of Laser Transmitter XT20 and XT22
Tap the Live Device View to open Context menu and tap "CALIBRATE". Calibrate XT20/XT22 electronic levels horizontally by following the Calibration guide in the app.
Go to Calibrate XT20/XT22 electronic levels horizontally
Go to Calibrate XT22 electronic level vertically
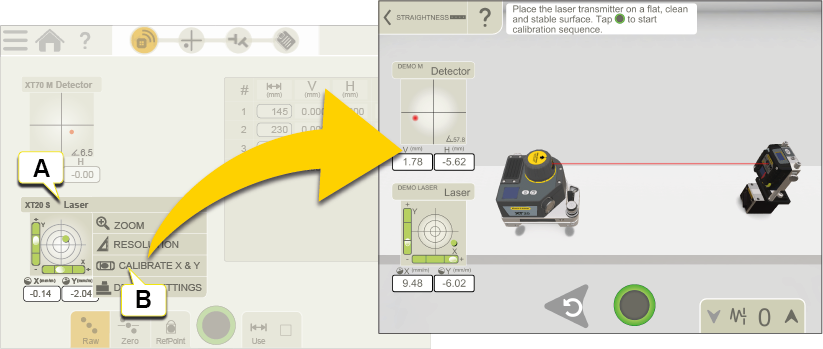
- Tap the Live Device View to open Context menu.
- Tap to calibrate laser transmitter.
NOTE! If you want to use electronic levels, these must be calibrated before you start measuring.