Measure using EasyTurn™
With EasyTurn™, it is possible to measure with as little as 40º spread between the measurement points. However, for an even more accurate result, try to spread the points as much as possible.
Preparations
Before you start measuring, make sure you have done the preparations you need.
- Mount the measuring units.
- To calculate results, you need to enter at least the distance between the measuring units.
- Tap a target to connect measuring units. Go to Select measuring units.
- If needed, perform a rough alignment.
-
If needed, measure Softfoot. Go to Softfoot
Measure
It is possible to switch measuring method before you have registered a value.
- Tap
 on the tab to select the method EasyTurn.
 - Adjust laser to the center of the targets. If needed, adjust the units on the rods, then use laser adjustments knobs.
- Tap
 to register the first position. A red marking is displayed.
 -
Turn the shafts at least 20º.
- Tap to register the second position.
-
Turn the shafts at least 20º.
- Tap to register the third position.
- Tap
 to go to the Result view, or tap
  to measure again.
The registered values are saved when you leave the Measure view. If you return to the Measure view, it is possible to do a new measurement.
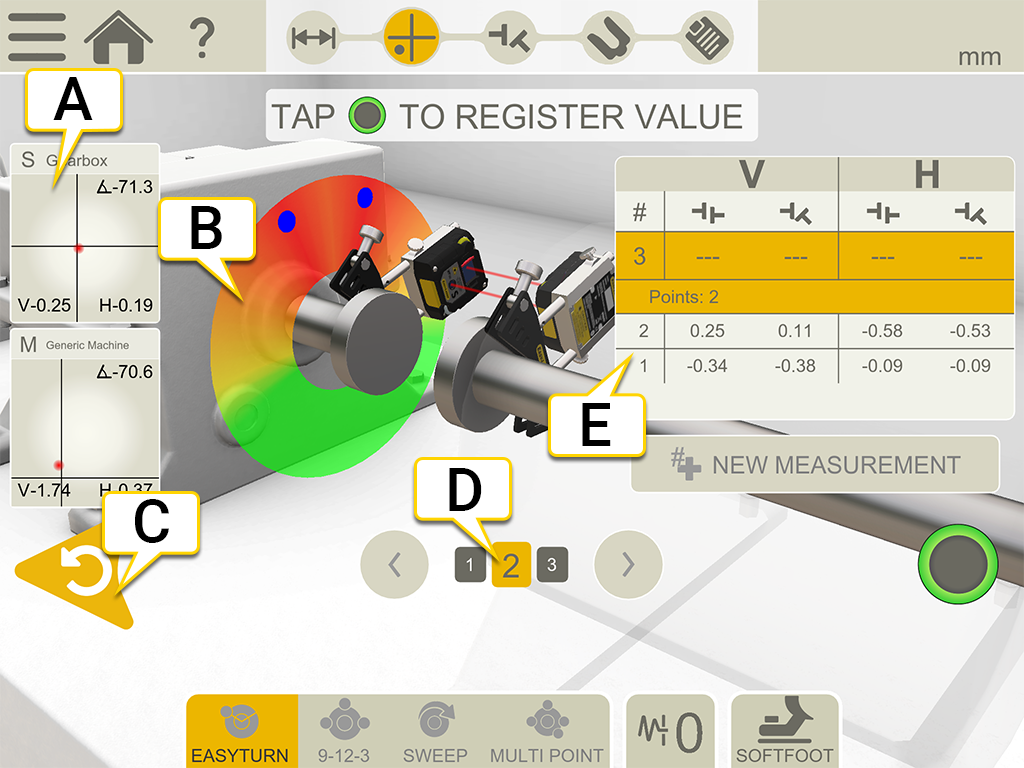
- Tap to display detector information.
- Red = turn shafts outside the red marking.
Green = turn shafts to green area.
Blue = registered position. - Delete registered value.
- Active coupling is yellow. Tap the arrows to move to other couplings.
- Measurement table. If you have selected spacer shaft, see information below.
|
|
Make a new measurement. This makes it possible to check the repeatability of the measurement. |
|
|
Measure using EasyTurn™. |
|
|
Measure using 9-12-3. |

|
Measure using Multipoint. |

|
Measure using Continuous sweep. |

|
Set Filter value. |
|
|
Measure Softfoot. |
Spacer shaft in measurement table
![]()
- Vertical values for angle A and B
- Horizontal values for angle A and B
Edge warning
When the laser beam is close to the edge, the edge is “lit up” as a warning. It is still possible to register values when the edge warning is active.
Zero inclinometer
If the machine is mounted on an inclined base plane, you can manually set the inclinometer to a new 12 o'clock position. The following measurements will then use the new inclinometer settings.
- Choose the measuring method you want to use.
- Turn the measuring units so that the rods are perpendicular to the base plane.
- Tap
 and
and  .
. - Confirm the desired position for the measuring units by tapping
 . The inclinometer will now be set to zero.
Your inclinometer adjustment will be applied during the whole measurement session, but will be restored when you start a new measurement from the start menu.
Explanation regarding measurement table for all machine train measuring methods
| ! | Uncertain coupling. When you adjust one coupling, it might affect the next coupling in the machine train. This coupling needs to be remeasured. |
| * | The coupling has been adjusted. This is not a value from your original measuring. |