Easy-Laser® E960 - Turbine alignment

Reliabile and precise turbine alignment

Easy-Laser® E960 Turbine alignment systems make the measurement and adjustment work of diapraghms and bearings easier thanks to the wireless detector unit and measurement programs that guides you through the measurement process. 

All of the parts included in the systems are designed and built for even the most demanding workplace and for easy setup on any machinery. The versatile design solves the straightness measurement problems quickly and with precision for any kind of application. Objects up to 40 m (132 feet) can be measured. The detector reads measurement values with a resolution of 0.001 mm (0.05 mils).

Easy-Laser® E960-A and E960-B

The system comes in two versions. Easy-Laser® E960-A has a measuring probe with a stroke of 10 mm. The slidable tube makes it possible to measure several positions in a row without moving the bracket. Suitable for gas turbines and smaller steam turbines. Easy-Laser® E960-B has a measuring probe with a stroke of 60 mm. This system is suitable for larger turbines. Software, laser transmitter and detector are common to the systems. The detector brackets differ. See system content under tab "System parts".

Versatile programs

The straightness programs of system E960 are very versatile, and let you work in the way that suits every job best. You can add, remove and remeasure measurement points at any time during the measurement. Up to 999 points can be handled by the program. You can include both full bores and half bores in any possible combination in one measurement, the program will calculate the correct centre line in all cases. The measurement program includes many different methods for straightness measurement: 1-point measurement, 4-point measurement, Multipoint measurement (also ovality measurement), 3-point measurement, 3-point measurement with arbitrary angles. Optionally a reference detector can be used to monitor the laser transmitter position at long distances.

The measurement result

Thanks to the large colour display with clear graphs and measurement data you can evaluate the result directly on site. Any point can be set as reference and you can set an offset to which the centre line will be recalculated. You can also calculate waviness (short and long) and best-fit for the points. If you want, the result can also be checked against a tolerance value. The measurement system takes care of all these complicated calculations for you.

[MÄTPROGRAM]

The featured programs below are the most common used with this system. Please click here for a complete overview of possibilities.
*=accessories needed

Half circle, Straightness 3-point

Readings taken in three positions: 9, 6 and 3. Allows varying diameters. To be used together with the turbine system. With advanced "best-fit" calculations.

Centre-of-circle, Straightness 2-point

Used for straightness measurement of bearing journals when the bore diameter varies. For example, diesel engines, propeller shaft installations, etc. With advanced "best-fit" calculations.

Straightness, 4-point

Used for straightness measurement of bearing journals. Measures two points in each direction, X and Y. Can handle up to 999 measurement points with two zero points. With advanced "best-fit" calculations.

Straightness, Multipoint

Used for straightness measurement of bearing journals. The number of measurement positions are theoretically unlimited for each measurement point. Can handle up to 999 measurement points with two zero points. With advanced "best-fit" calculations.

Ovality/roundness

For ovality measurements of bore and bearing journals. The number of measurement positions are theoretically unlimited for each bore.

Straightness measurement

With our program for measuring straightness, you can easily measure long shafts, rolls, bearings, bases, machine structures etc. All you have to do is define a number of measuring points, in advance or while measuring. You will be able to get the result for both the horizontal and vertical alignment, graphically as well as digitally. 

[SMARTA FUNKTIONER]

Measurement value filter
Templates
Multiple languages

[DOCUMENTATION]

EasyLink™ PC software
Save to USB memory
Save to built-in memory
Create a PDF report
Make a printout

Display unit E51

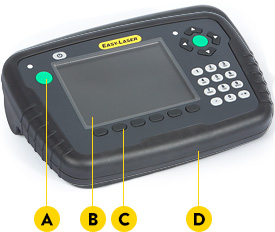
The display unit for the E series enables you to work more efficiently and for longer than ever before thanks to several innovative solutions. It is also ergonomically designed with easy-to-grip rubber cladding and robust construction.

Ergonomic design

The display unit has a thin, easy-to-grip and rubber coated profile that ensures a secure grip. It has large well-spaced buttons that give clear feedback when pushed. In addition, the two Enter buttons make the system suitable for both right and left-handed users. The display screen has clear graphics that guide you through the measurement process.

Personal settings

You can create a user profile where you can save your personal settings. You can also have different settings for different types of measurements. It makes work faster!

Language selection

You can choose the language that you want to appear on screen. English, German, French, Spanish, Portuguese, Swedish, Finnish, Russian, Polish, Dutch, Italian, Japanese, Korean and Chinese are available. 

Upgrading

If you wish to expand functionality in the future, the software in the display unit can be upgraded via the internet or by connecting a USB memory containing the new software. In this way you will also have access to the measurement programmes that we develop for new purposes in the future.

  1. Two Enter buttons, for left and right-handed users
  2. Large, easy to read 5.7” colour display
  3. Proper buttons for clear feedback
  4. Thin profile gives a perfect grip for your hands
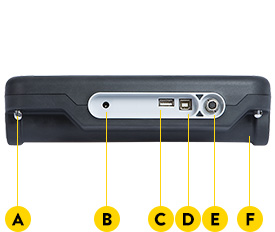
  1. Mounting for shoulder strap
  2. Connection for charger
  3. USB A
  4. USB B
  5. Easy-Laser® measurement equipment
  6. Robust, rubber coated design

Note: Dust and splash guards for connectors that are not used when measuring

Detector bracket short stroke

Measuring probe with a stroke of 10 mm. The slidable tube makes it possible to measure several positions in a row without moving the bracket. Suitable for gas turbines and smaller steam turbines.

  1. Slidable tube
  2. Extendable aluminium beam
  3. Magnet base
  4. Detector slide
  5. Measuring probe

Detector bracket long stroke

Measuring probe with a stroke of 60 mm. Suitable for larger turbines.

  1. Extendable aluminium beam
  2. Magnet base
  3. Detector slide
  4. Measuring probe

D75 Laser transmitter with beam bracket

The laser transmitters’ rigid design assures highest measurement accuracy. The transmitter spans over the bore, bearing journal or sterntube with a bracket with two magnet bases. Or three magnet bases if a vertical support beam is used. The magnet bases can be mounted axially or vertically on the aluminium beams to suit the application best. Fine adjustment of the laser beam in horizontal and vertical direction is made very easy with the offset hub. Included with system E950-B. Included with system E960-A and E960-B.

  1. Magnet base
  2. Offset hub
  3. Laser transmitter
  4. Laser beam angle adjustment
  5. Mounting threads for vertical support beam.

A COMPLETE SYSTEM CONTAINS

E960-A

  • 1 Laser transmitter D75
  • 1 Detector E7
  • 1 Display unit
  • 1 BT wireless unit
  • 1 Cable 2 m
  • 1 Cable 5 m (extension)
  • 1 Offset hub for D75
  • 1 Transmitter bracket, with 3 magnet bases
  • 1 Detector bracket Short stroke, with 2 magnet bases
  • 2 Target for centering of brackets
  • 1 Manual
  • 1 Measuring tape 5 m
  • 1 USB memory stick with documentation
  • 1 USB cable
  • 1 Battery charger (100–240 V AC)
  • 1 Toolbox
  • 1 Shoulder strap for display unit
  • 1 Cleaning cloth for optics
  • 1 Carrying case 

E960-B

  • 1 Laser transmitter D75
  • 1 Detector E7
  • 1 Display unit
  • 1 BT wireless unit
  • 1 Cable 2 m
  • 1 Cable 5 m (extension)
  • 1 Offset hub for D75
  • 1 Transmitter bracket, with 3 magnet bases
  • 1 Detector bracket Long stroke, with 2 magnet bases
  • 2 Target for centering of brackets
  • 1 Manual
  • 1 Measuring tape 5 m
  • 1 USB memory stick with documentation
  • 1 USB cable
  • 1 Battery charger (100–240 V AC)
  • 1 Toolbox
  • 1 Shoulder strap for display unit
  • 1 Cleaning cloth for optics
  • 1 Carrying case

Display_Unit

Name
E51
Part No.
12-0418
Type of display/size
VGA 5.7” colour screen, backlit LED
Displayed resolution
0.001 mm / 0.05 thou
Internal battery (fixed)
Heavy duty Li Ion chargeable
Battery compartment
For 4 x R14 (C)
Connections
USB A, USB B, Easy-Laser® units, Charger
Operating temperature
-10–50 °C
Wireless communication
BT wireless technology
Internal memory
>100 000 measurements can be saved
Help functions
Calculator, Unit converter
Environmental protection
IP class 65
Housing material
PC/ABS + TPE
Dimensions
WxHxD: 250x175x63 mm [9.8”x6.9”x2.5”]
Weight (without batteries)
1080 g [2.4 lbs]

Laser_Transmitter

Name
D75
Part No.
12-0075
Type of laser
Diode laser
Laser wavelength
630–680 nm, visible red light
Laser Safety Class
Class 2
Adjustable modulation
5, 32 KH
Output
< 1 mW
Beam diameter
6 mm [1/4"] at aperture
Working area, range
40 m [130']
Type of battery
1 x R14 (C)
Operating time/battery
approx. 15 h
Laser adjustment
D75: 2 ways ±2° (± 35 mm/m)
Housing material
Anodized aluminium
Dimensions
WxHxD: 60x60x120 mm [2.36x2.36x4.72"]
Weight
780 g [27.5 oz]

Detectors

Name
E7
Part No.
12-0752
Wireless communication
Wireless unit 12-0436 (separate item) or cable
Type of detector
2 axis PSD 20x20 mm [0.78" sq]
Resolution
0.001 mm [0.05 mils]
Measurement error
±1µm ±1%
Inclinometers
0.1° resolution
Thermal sensor
± 1° C accuracy
Environmental protection
IP Class 66 and 67
Internal battery
Li Ion
Operating temperature
-10–50 °C
Protection
No influence from ambient light
Housing material
Anodized aluminium, Plastics
Dimensions
WxHxD: 60x60x42 mm [2.36x2.36x1.65”]
Weight
186 g [6.6 oz]

Wireless_Unit

Name
Wireless unit for E7, E5, E4, ES, EM, ESH, EMH
Part No.
12-0436
Wireless communication
BT wireless technology
Temperature range
-10–50 °C
Environmental protection
IP class 66 and 67
Housing material
ABS
Dimensions
WxHxD: 53x32x24 mm [2.1"x1.2"x0.9"]
Weight
25 g [0.9 oz]

Manuals

Turbine Guide
E9xx Geometric Manual

Brochures

Product Catalogue rev. 23
Product Overview
E960 Turbine

For software, see Support > Software download.
E930 - Extruder

Easy-Laser® E930 is designed to measure straightness and pointing direction, primarily on extruder pipes. Another application can be e.g. hydraulic pipes. 

XT980 - Sawmill

The Easy-Laser® XT980 Sawmill system will help you increase efficiency and save money in your sawmill. The system measures straightness, flatness and squareness. Equally useful on band saws and circular saws.

E950 - Bore alignment

Easy-Laser® E950 makes checking and aligning bearings and bearing journals easy. All of the parts included in the systems are designed and built for even the most demanding workplace and for easy setup on any machinery.

E960 - Turbine alignment

Easy-Laser® E960 Turbine alignment systems make the measurement and adjustment work of diapraghms and bearings easier thanks to the wireless detector unit and measurement programs that guides you through the measurement process.

E970 - Parallelism

For parallelism measurement of rolls and other objects in numerous applications. The Easy-Laser® E970 is especially suitable when many objects are to be measured and aligned, and when the distances are long. 

E980 - Sawmill

The Easy-Laser® E980 Sawmill system will help you increase efficiency and save money in your sawmill. The system measures straightness, flatness and squareness. Equally useful on band saws and circular saws.

E910 - Flange

Easy-Laser® E910 Flange is a system used to measure flange flatness of windmill towers, wings and hubs, tower bases, etc. It can also be used for parallelism measurement.

E915 - Flange spin

Easy-Laser® E915 is a system used to measure flange flatness of windmill towers and slewing bearings with an easy-to-use rotating laser. 

E920 - Geometric

Easy-Laser® E920 can be used to carry out all the most common geometric measurements; straightness, flatness, squareness, plumb and level. Measurement is quick and precise.