XT770 with Geo kit and XT20
XT770 with Geo kit and XT22
XT770 with Geo kit and XT20
XT770 with Geo kit and XT22

Easy-Laser® XT770 Shaft+GEO - Shaft alignment and geo applications

The complete laser alignment system

The XT770 Shaft+GEO system has all the programs and functions you need to install and keep your machines up and running. Compared to the standard XT770 Shaft it also comes with a separate laser transmitter. With XT770 Shaft+GEO you can carry out the following:

  • Align the machine
  • Check soft foot
  • ​Check twist and flatness
  • Check straightness
  • Measure machine movement over time

With XT770 Shaft+GEO you can perform shaft alignment of horizontally and vertically/flange mounted machines, and align machine trains with an unlimited number of machines. You can also measure straightness, flatness and twist of foundation, soft foot, bearing clearance, and more.

2 axis PSDs (position-sensitive detectors) permits adjustment of your machine both vertically and horizontally at the same time, with measuring units in any position.

You have a choice of five shaft alignment measurement methods, e.g. continuous sweep and multipoint. This gives you the flexibility you need to achieve the perfect measurement result. Read more about the different measurement methods under the Features tab.

Laser transmitters for geometric measurements

The system also includes laser transmitter XT20 or XT22, which allow you to take flatness and straightness measurements with the highest reliability and precision.

  • XT20 is perfect for checking flatness and straightness during machine installation or surface flatness of machined parts.
  • XT22 also lets you point the laser beam perpendicular to the laser plane. It provides more options for geometrical measurements, and even higher accuracy and precision.

Learn more about the transmitters

Bore alignment capabilities

The Bore center program is used together with the Bore bracket kit (accessory) and its D75 laser transmitter. Either you use the XT70-M unit as detector, included with the XT770 system, or upgrade with the XT9 detector (accessory) to be able to measure smaller diameters. Different brackets can be used depending on the type of job. 

Use with any display device

As all other XT systems, the XT770 Shaft+GEO can be used with the display unit of your choice. The XT Alignment app can be run on virtually any iOS or Android device*, or the Easy-Laser XT display unit. Click here for list of compatible devices.

Unique documentation possibilities

The XT display unit has a 13MP camera, and you can also get it with a built-in IR camera as an option. This means you can add a thermal image of the machine before and after alignment. In the app you can easily create and share a PDF report containing all measurement data and images.

Get to know Generation XT

Download

If you don't have access to Google Play:

XT Alignment app for Android 
(Version 8.3.4, 296MB)

Blog:Understanding casing distortion in machinery

One of the most critical issues affecting rotating machines is casing distortion. This article delves into what casing distortion means, how it impacts machine performance, and why it's essential to address it in order to achieve reliable operation. Read more

Measurement programs

The featured programs below are the most common used with this system. Please click here for a complete overview of possibilities.
*=accessories needed
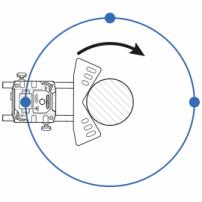
Horizontal machines

The user interface is intuitive and guide you through the measurement process. It is animated and zooms into the most important things for each step. You can save the measurements of a machine for As found and As left in the same file.

Vertical/flange mounted machines

For measurement and alignment of vertically and flange mounted machines.

Easy-Laser XT machine train
Machine train

Build your own machine train with theoretically as many machines as you like. You can pick the reference machine manually, or let the program choose one that will minimize the need for adjustments.

Alignment program for cardan/offset mounted machines
Cardan/offset mounted machines*

For alignment of cardan/offset mounted machinery. (Requires additional Cardan bracket kit.)

Soft foot check

Alignment work begins with a soft foot check. The soft foot check ensures that the machine is resting evenly on all its feet by indicating which foot/feet should be adjusted. This is an important part of securing a reliable alignment. After the soft foot check is complete, you can go directly to the alignment program with all of the machine’s distance values saved.

Easy-Laser XT EasyTrend
EasyTrend*

Makes it possible to keep track of machine movement over time. Thus you can check for e.g. thermal expansion and pipe strain issues.

Basic Flatness program to check the flatness of foundations and frames
Basic flatness*

With this program you can check the flatness of foundations and frames, using two rows of points, 2 to 8 points per row. Separate laser transmitter required. (Requires laser transmitter XT20 or XT22).

Twist measurement

Program to measure flatness/twist of, for example, machine foundation, machine tables, etc. 

XT Straightness program
Straightness

With our program for measuring straightness, you can easily measure long shafts, rolls, bearing journals, bases, overhead rails, machine structures etc. You will be able to get the result for both the horizontal and vertical alignment, graphically as well as digitally. The program automatically calculates different Best-fit results. (Requires laser transmitter XT20 or XT22)

XT Bore center program
Bore center

Use this program to measure the straightness of bore center line, bearing journals and other cylindrical objects. Measure 3–50 points at each position (Multipoint). If required, you can set tolerances. The result can be displayed as Best-fit calculated. Individual points can be remeasured. (Requires XT Bore bracket kit).

Values – Shaft alignment applications

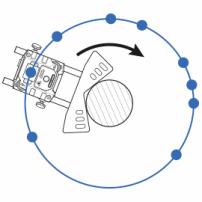
Use the M and S measuring units included to measure as with digital dial gauges, but with laser precision and the possibility to document the measurement result. Another application is to check shaft radial play (bearing play).

Belt alignment program
Belt alignment*

Using the system you can align sheaves and pulleys with digital precision. Adjustment of the machines is displayed in real time on the screen, with readings for angle and axial displacement in both the vertical and horizontal axes, as well as an adjustment value for the front or rear foot pair. The result can be documented as normal. (Requires the XT190 BTA accessory.) 

Vibration analysis*

Diagnose vibration level, unbalance, misalignment and looseness. (Requires the XT280 accessory.) 

Measurement methods

9-12-3
9-12-3

Measurement points are recorded at fixed points 9, 12 and 3 o’clock. This is the classic three-point method which can be used in most cases. The preferred method for situations where the machine to be aligned is mounted on a moving object, and it is not possible to use the inclinometers (e.g., on ships, cranes, wind turbines etc.).
EasyTurn™ function
EasyTurn™ function

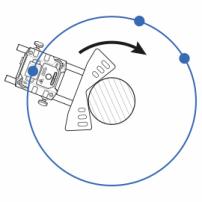
Ideal method for coupled machines where you manually rotate the shafts to any position. The EasyTurn™ function allows you to begin the measurement process from anywhere on the turn. You can turn the shaft to any three positions with as little as 20° between each position to register the measurement values. An easier-to-use version of the three-point method (see 9–12–3). 
Continuous sweep
Continuous sweep

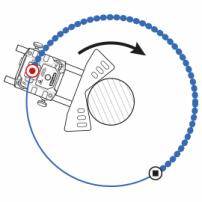
Automatic recording of measurement values during continuous sweeping of the shaft. The easiest and quickest way to obtain the alignment status on coupled machines. Hundreds of points are registered. Start recording, rotate, and stop at any angle and you get the results instantly. Quality check of measurement is provided (see example down left).

Multi point
Multi point

Multi point is basically the same as EasyTurn™, but instead you can record multiple points on the sector rotated. This will provide an optimized calculation basis. Perfect for e.g. turbine and sliding bearing applications. 
Uncoupled sweep
Uncoupled sweep
Uncoupled sweep

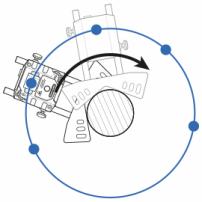
Used when the machines are uncoupled and when the rotation can be difficult to control. Rotate one shaft/unit at a time to pass with the beam over the other (stationary). Repeat alternately until enough measurement points are recorded. You can start and stop anywhere on the turn. Use it for big heavy machinery like gas turbines, wind turbines or gear boxes which can be difficult to rotate to a specific position.

Smart functions

Measurement value filter
Result table
Multiple sets of feet
Thermal growth compensation
Tolerance check
Swap view function
360 Live adjustment
Wide live adjustment
Adjustment guide
Select machine image
Mirror machine image
Read QR and bar codes
Templates
Locked feet
Select coupling type
Continue session
Sign reports electronically
Built-in manual
AV connector
Multiple languages

Documentation

Save to USB memory
Save to built-in memory
Make a printout
Add pictures
Versatile reports
Share your reports

Measuring units XT70-M / XT70-S

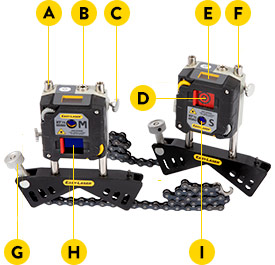
The XT70 measuring units utilize dot-type laser and 2-axis square PSD surfaces. A state-of-the-art OLED display shows the angle of the unit, making it easier to position it on the shaft.

Rigid and rugged

The diagonally positioned fastening screws set the unit in a grid-lock on the rods. Rigid aluminium housing for maximum stability. IP66 and 67, dust- water- and shockproof. Heavy-duty battery for very long operating times. Built-in wireless technology.

Features

  • Built-in wireless technology. Integrated rechargeable battery. 
  • TruePSD technology with unlimited resolution for greatest accuracy.
  • Dual laser beams and PSDs.
  • Sturdy aluminium body. IP66/67 design.
  • OLED display shows the angle of the unit 
  • Slideable target
  • 24 hours operating time
  1. Laser angle adjustment
  2. Charger connector
  3. Locking knob
  4. Slidable target/dust cover
  5. OLED display: battery status/unit angle
  6. Extendable stainless steel rods
  7. Chain tightening knob
  8. PSD aperture
  9. Laser aperture

Display unit XT12 (optional)

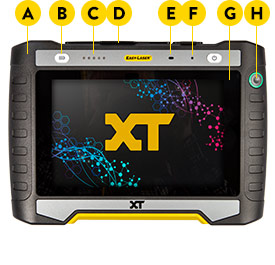
Rugged, robust, industrial grade tablet with wear resistant rubberized protective coating. IP66 and 67, dust- water- and shockproof. As standard a 13 MP camera for documentation is built-in, but you can also choose a model with IR camera added.

Glove enabled touch-screen

A large 8", glove-enabled touch-screen makes the information clear and the app easy to use. You can check battery status also when the unit is turned off .
Heavy-duty rechargeable battery for very long operatong times; up to 16 hours. Fastening points for shoulder strap (included).

Features

  • Robust, rubber coated design, IP66/67.
  • Large 8” glove enabled touch-screen.
  • IR Camera for thermal images (optional).
  • 16 hours operating time.
  1. Ergonomic, rubber coated housing
  2. Battery status-check button
  3. Battery status indicators
  4. Dust cover and protection on for connectors (Note: connectors are dust- and waterproof)
  5. Proximity sensor
  6. Display brightness sensor
  7. Large and clear 8" glove-enabled touch-screen
  8. Enter button
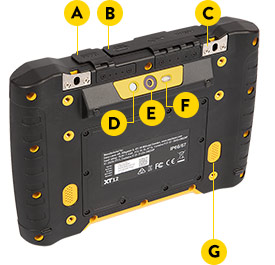
  1. Charger
  2. USB C / USB A / AV connector (HDMI)
  3. Fastening points for shoulder strap (x2) 
  4. IR Camera (optional)
  5. 13 Mp Camera
  6. LED Light 
  7. Loudspeakers

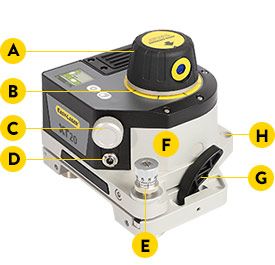
XT20 Laser transmitter

Laser transmitter XT20 can be used to measure flatness and straightness. The laser beam can sweep 360° with a measurement distance of up to 20 metres [65´] in radius. The laser head is super stable, but still easy to turn. No need for locking/unlocking screw. The laser head fine turning knob makes it very easy to point the beam at the detector also on long distances (gear ratio 1:132).

We have installed electronic precision vials in the XT transmitters. This gives the advantage of faster feedback when levelling and less risk of errors during calibration, because all users see the same angular value (compared with reading spirit levels).

The XT transmitters have wireless connection to our XT Alignment App. This means that you get warning messages during measurement about events that can affect the result negatively, for example if the transmitter position might have been affected, or temperature changes inside the unit. We can also let the app guide you step-by-step when calibrating the levels before measuring.

The transmitter has many mounting options. The three super magnets can be mounted at many different positions on the transmitter, making it possible to also place the transmitter on a small surface, when needed.

The Multi-bracket (included) provides a lot of extra, versatile mounting possibilities, for example mounting on tripod, magnet bases, or rods to elevate the transmitter.

Learn more in the XT20/XT22 brochure.

  1. Super stable rotatable head, still easy to turn. No need for locking/unlocking screw. One aperture.
  2. Marking for every 45°. For quick rough alignment.
  3. Fine turning of laser beam head.
  4. Charger connection.
  5. Tilt adjustment (×2).
    Tilt table with large adjustment angle, ±1.3° (±23 mm/m [±23 mils/inch]).
  6. Solid aluminium core ensures rigid design.
  7. Release lever.
    Also for dampening the strong magnet force when placing the transmitter on the surface.
  8. Fastening of separate magnet bases (×2). 


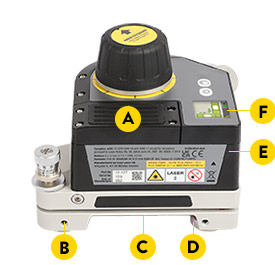
  1. Rubberized grip surface.
  2. M6 thread (×4) for safety strap screw and other accessories/adaptations.
  3. Countersunk profile for fingers, for better grip when lifting the transmitter.
  4. Super magnets (×3).
  5. Square design makes it easy to position in a corner of an object, it also clearly indicates tilting angles and simplifies calibration.
  6. Clear TFT colour display.
    On/Off, Change display view.

XT22 Laser transmitter

Laser transmitter XT22 can be used to measure flatness, straightness, squareness, level and parallelism. The laser beam can sweep 360° with a measurement distance of up to 40 metres [130´] in radius. The laser head is super stable, but still easy to turn. No need for locking/unlocking screw.

We have installed electronic precision vials in the XT transmitters. This gives the advantage of faster feedback when levelling and less risk of errors during calibration, because all users see the same angular value (compared with reading spirit levels).

The laser beam can be pointed perpendicular to the flatness plane, within 0.01 mm/m [0.01 mils/inch]. XT22 has a fine turning mechanism for the laser head with a gear ratio of 1:1320, which makes it super easy to point the beam at the detector also on very long distances.

The fiber-coupled laser creates an extremely smooth laser beam profile, free from reflections and irregularities. This means that the laser beam will have very good optical properties in terms of straightness (± 0.003 mm [± 0.12 mils]).

The transmitter has many mounting options. The three super magnets can be mounted at many different positions on the transmitter, making it possible to also place the transmitter on a small surface, when needed.

The Multi-bracket (included) provides a lot of extra, versatile mounting possibilities, for example mounting on tripod, magnet bases, or rods to elevate the transmitter.

Learn more in the XT20/XT22 brochure.

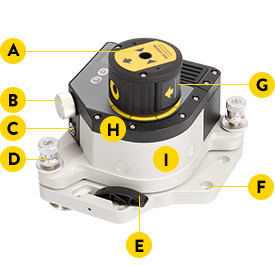
  1. Super stable rotatable head, still easy to turn. No need for locking/unlocking screw. Two apertures. 
  2. Super fine turning of laser beam head. 
    Simplifies beam positioning to detector on very long distances like the 40 m [132'] maximum. 
  3. Charger connection.
  4. Tilt adjustment (×2).
    Tilt table with large adjustment angle, ±1.3° (±23 mm/m [±23 mils/inch]).
  5. Release lever.
    Also for dampening the strong magnet force when placing the transmitter on the surface.
  6. Fastening of separate magnet bases (×2). 
  7. Flippable angular prism.
    Provides a laser beam perpendicular to the flatness plane.
  8. Solid aluminium core ensures rigid design.
  9. Marking for every 45°. 
    For quick rough alignment.


  1. Rubberized grip surface.
  2. M6 thread (×4) for safety strap screw and other accessories/adaptations.
  3. Countersunk profile for fingers, for better grip when lifting the transmitter.
  4. Super magnets (×3).
  5. Square design makes it easy to position in a corner of an object, it also clearly indicates tilting angles and simplifies calibration.
  6. Clear TFT colour display.
    On/Off, Change display view.

A complete system contains

All XT770 Shaft+Geo systems include:​

  • 1 Measuring unit XT70-M
  • 1 Measuring unit XT70-S
  • 1 Laser transmitter XT20 or XT22
  • 1 Multi-bracket for laser transmitter
  • 2 Shaft brackets with chains and rods 120 mm [4.72"]
  • 1 Set of rods 4×75 mm [2.95"]
  • 2 sets of rods 4×120 mm [4.72"]
  • 1 Magnet base
  • 1 Magnet base with turnable head 
  • 2 Offset brackets
  • 2 Extension chain 900 mm [35.4"]
  • 1 Measuring tape 3 m [9.8']
  • 1 Hexagon wrench set
  • 1 Charger (100–240 V AC)
  • 1 DC split cable for charging
  • 1 DC to USB adapter, for charging
  • 1 Quick reference manual
  • 1 Cleaning cloth for optics
  • 1 USB memory with manuals
  • 1 Carrying Large GEO, with wheels
  • 1 Set of QR code stickers

Optional:

  • XT12 Display unit, with or without IR camera

Display Unit

Name
XT12
Type of display/size
8" LCD capacitive multi-touch colour display
Internal battery (fixed)
Heavy duty Li Ion chargeable
Connections
USB A, USB C, Charger, AV
Operating temperature
-10–50 °C
Storage temperature
-20–50 °C
Communication
Wireless technology, WiFi
Relative humidity
10–95%
Loundspeakers
Built-in, rear-facing
Charger
15 V
Camera
13 Mp autofocus, with LED diode
IR camera (optional)
FLIR LEPTON® (0–400 °C, 32–752 °F)
Help functions
Built-in manual
Environmental protection
IP class 66 and 67. Designed for outdoor use (pollution degree 4)
Housing material
PC/TPE or PC/TPU
Dimensions
WxHxD: 269.0x190.0x49.4 mm [10.59x7.48x1.95"]
Weight (without batteries)
1400 g [49.4 oz]
Operating time
Up to 16 h continuously

Measuring Units

Name
XT70-M / XT70-S
Communication
BT wireless technology
Type of detector
2 axis TruePSD 20x20 mm [0.79x0.79"]
Resolution
0.001 mm [0.05 mils]
Measurement accuracy
±1µm ±1%
Measurement range
Up to 20 m [66 feet]
Type of laser
Diode laser
Laser wavelength
630-680 nm
Laser class
Safety class 2
Laser output
<1 mW
Electronic inclinometer
0.1° resolution
Environmental protection
IP class 66 and 67
Operating temperature
-10–50 °C
Storage temperature
-20–50 °C
Relative humidity
10–95%
Housing material
Anodized aluminium + PC/ABS + TPE
Dimensions
WxHxD: 76x76.7x45.9 mm [3.0x3.0x1.8"]
Weight
272 g [9.6 oz]
OLED display
128x64 pixels
Operating time
Up to 24 h continuously

XT shaft alignment demo

This video goes through the XT Horizontal Shaft Alignment program using the XT440 and XT770 measuring units.

(This video was produced by our Canadian partner Benchmark PDM.)

Know your machine from every angle with XT770

How to perform shaft alignment in 5 steps

Manuals

XT Series Manual (pdf)

Product information

XT770 Shaft alignment
XT20/XT22 Laser transmitters
XT Dynamic brackets
Product Catalogue rev. 24
Product Overview

For software, see Support > Software download.
XT440 - Shaft alignment

Easy-Laser® XT440 is our most basic, app based system. Lets you perform all necessary steps of shaft alignment on horizontal and vertically/flange mounted machines. 

XT550 - Ex/ATEX Shaft alignment

Easy-Laser® XT550 is an intrinsically safe shaft alignment system, developed for use in potentially hazardous areas.

XT660 - Shaft alignment

With Easy-Laser® XT660 you can deal with all the important steps of machine setup and maintenance.

XT770 - Shaft alignment

With Easy-Laser® XT770 you can perform shaft alignment of horizontal and vertically/flange mounted machines, but also align machine trains, measure twist of foundation, and more.

Wind - Shaft alignment

Shaft alignment systems specially developed for alignment of wind turbines. 

XT770 Shaft+GEO - Shaft alignment and geo applications

With Easy-Laser® XT770 Shaft+GEO you can perform shaft alignment of horizontal and vertically/flange mounted machines, and align machine trains with an unlimited number of machines. You can also measure strainghtness, flatness, twist of foundation, and more.